


Product Details
About This
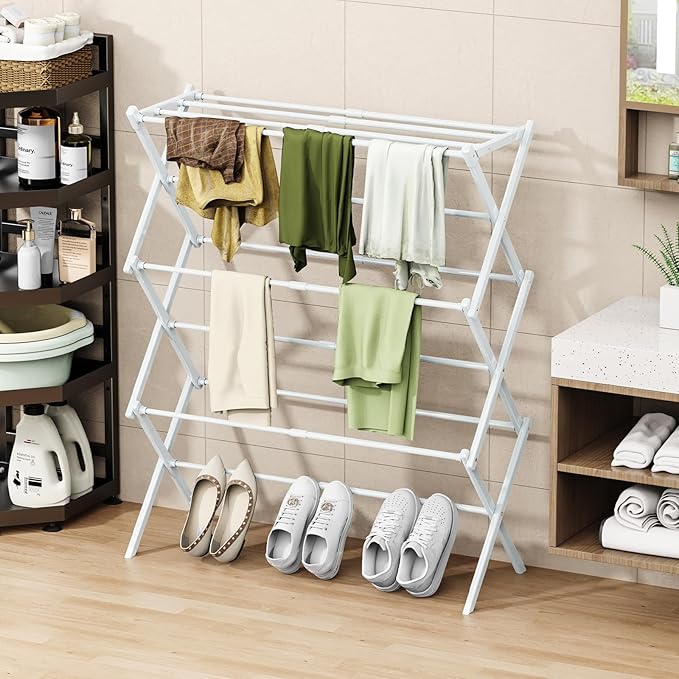
- Folding Clothes Drying Rack: One gentle push collapses the rack to just a few inches thick. Slide it behind the laundry room door, under the bed, perfect for apartments, dorms, or weekend trips.
- Strong Construction: Sturdy powder-coated steel frame plus four non-slip rubber feet keep the rack stable and scratch-free on any surface.
- Expandable Design: The 3-tier design, Eleven steel rods extend from 16.5" to 28", providing ample drying space for towels, clothes, sweaters, and more.
- Never Rust: Powder-coated steel shrugs off rain, humidity, and daily wear—no flaking, no wobble. so it stays sleek and strong season after season, indoors or out.
- Easy Assembly with Visual Guide: To ensure the rack stays together, please refer to the assembly diagrams in our product images. Pro-tip: Distinguish between Rack A (for thin tubes) and Rack B (for thick tubes), and apply firm downward pressure during installation to fully lock each tube into place.
Overview
- Material : Carbon Steel
- Product Dimensions : 28"D x 10"W x 35"H
- Brand : STARLATTA
- Color : White
- Recommended Uses For Product : Clothing
- Mounting Type : Floor Mount
- Special Feature : Durable, Expandable, Foldable, Lightweight, Waterproof
- Manufacturer : STARLATTA
- Size : 28"D x 10"W x 35"H
- Assembly Instructions Description : STARLATTA Assembly Guide: How to Ensure Stability Many customers found the assembly challenging because this rack is designed with a high-precision, tight-fit interface to ensure maximum weight capacity once locked. Please follow these key steps to ensure your rack stays together perfectly: Step 1: Identify the Components Rack A (Left): Designed for Thin Tubes. Rack B (Right): Designed for Thick Tubes. Note: Thick and thin tubes are nested together; please pull them apart gently first. Step 2: Assemble the Left Side Take a Thin Tube and align it with the small hole on Rack A. Key Action: Apply significant downward force until the tube is fully seated at the bottom of the hole. You should feel a "locking" sensation. Step 3: Connect to the Right Side Lay Rack B flat on the floor with the large holes facing up. Align the tubes (the thick end) already attached to Rack A with the holes in Rack B. The tubes might feel loose at this point; simply ensure they are all positioned in the holes. Step 4: The Final Lock (CRITICAL for Stability) Stand the rack upright on a firm surface. Key Action: Use your palm to press down firmly on each connection point. Confirmation: Ensure the tubes are pushed to the very bottom of the holes. If they are not fully inserted, the rack will be unstable. STARLATTA Assembly Guide: How to Ensure Stability Many customers found the assembly challenging because this rack is designed with a high-precision, tight-fit interface to ens… See more
How long does shipping take?
Orders are typically processed and shipped within 3-5 business days. Please note that shipping times may vary slightly depending on the specific product. If there are any unexpected delays with your shipment, our team will proactively reach out to you via email.
What is your return and exchange policy?
We want you to love your home organization solutions! If you need to make a return or exchange, please contact us within 30 days of receiving your item. Just make sure to include your receipt (or order screenshot) and a photo of the unused product with its original packaging and tags intact.
Real-Life Organization Tips
View all-

First Impressions: Creating a High-End Guest Be...
With Mother’s Day and family gatherings just around the corner in May, your guest bedroom is about to take center stage. For a busy working mom, hosting guests can sometimes...
First Impressions: Creating a High-End Guest Be...
With Mother’s Day and family gatherings just around the corner in May, your guest bedroom is about to take center stage. For a busy working mom, hosting guests can sometimes...
-

The Best Mother’s Day Gift? The Gift of a Peace...
Mother’s Day is just around the corner, and while flowers are beautiful, they eventually fade. This year, why not give a gift that lasts—a gift that restores time, space, and...
The Best Mother’s Day Gift? The Gift of a Peace...
Mother’s Day is just around the corner, and while flowers are beautiful, they eventually fade. This year, why not give a gift that lasts—a gift that restores time, space, and...
-

Aesthetic Desk Setup: Boosting Productivity in ...
For the modern working mom, the "home office" is often a small corner of the bedroom or a shared space in the living room. It’s hard to switch into "professional...
Aesthetic Desk Setup: Boosting Productivity in ...
For the modern working mom, the "home office" is often a small corner of the bedroom or a shared space in the living room. It’s hard to switch into "professional...


